
The Ultimate Checklist for Upgrading Your Ride with Animated Motorcycle Lights
Share
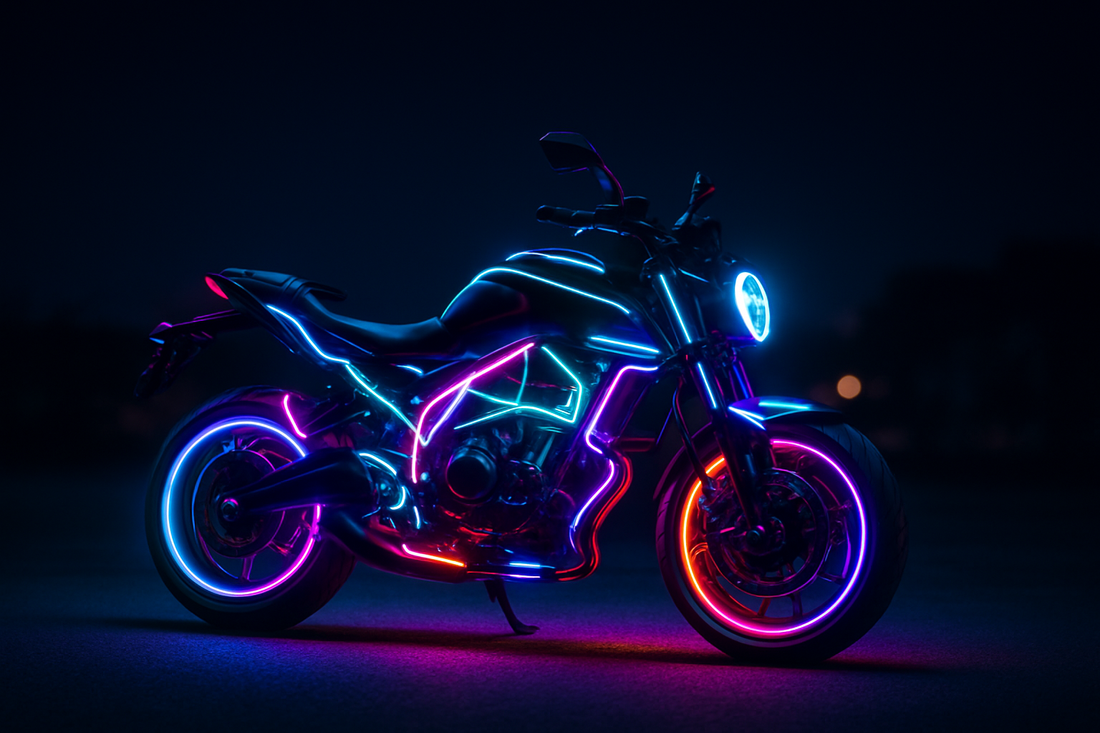
Picture this: your motorcycle lighting up the night, turning heads at every stoplight, and making a bold statement wherever the road takes you. If you’re ready to level up your ride and command attention, it’s time to consider an epic custom motorcycle lighting upgrade. This ultimate checklist will walk you through everything you need to know about adding animated motorcycle lights—like eye-popping Moto Eyes for bikes—for a jaw-dropping look and next-level safety.
Introduction: Make Your Ride Stand Out with Animated Motorcycle Lights
Why Upgrade to Animated Motorcycle Lights?
Upgrading to animated motorcycle lights instantly transforms your bike, giving it electrifying character and visibility. Whether you're commuting, cruising, or showing off at bike meets, these lights add cutting-edge flair and can help you stay safer by amping up your visibility on the road.
What You'll Find in This Checklist
This guide covers all the essentials—from understanding the perks of animated lighting to picking the perfect kit, installing it effortlessly, dialing in your favorite look with apps, and keeping your lights shining bright. Let’s dive in!
Step 1: Know the Basics of Animated Motorcycle Lights
What Are Animated Motorcycle Lights?
Animated motorcycle lights are advanced LED lighting solutions that go beyond simple, static glows. These dynamic lights feature scrolling, pulsing, and customizable effects—often controlled via smartphone apps. The Biker Eyes™ Animated Moto Eyes bring expressive, moving "eye" designs right from the Japanese bike culture, giving your ride a soul and a story.
Key Benefits of Upgrading Your Lighting
- Visibility: Enhanced light output grabs attention in dark, foggy, or rainy conditions—making you more noticeable to motorists.
- Style: Show off with custom effects, animation presets, and unique color options tailored to your mood or event.
- Safety: Brighter, motion-driven lighting improves your overall motorcycle visibility safety lights performance.
- Simplicity: Modern kits offer peel and stick motorcycle lights and app controlled motorcycle lights, making upgrades a breeze even for beginners.
How Animated Moto Eyes Enhance Bike Safety and Style
Besides making your bike a head-turner, expressive LED eye lights serve as active safety enhancements. Motion and brightness draw more attention from other drivers, reducing the chance of being overlooked in traffic—especially at night or in bad weather. With just a few taps, you can switch from subtle daytime looks to bold, animated effects that captivate at shows or on group rides.
Step 2: Assess Your Current Bike & Lighting Setup
Identify Your Stock Lighting Limitations
Spend a few minutes checking out your stock lighting. Are your lights dim, dull, or lacking that wow factor? Most OEM lights don’t offer fun customization or motion—making them a prime target for an upgrade.
Check Compatibility with Aftermarket LED Eye Lights
Take note of your bike’s make, model, and electrical system. Most modern animated motorcycle lights—including the Biker Eyes™ Moto Eyes—are universal and run off your battery or USB power. Still, ensure your kit works with your voltage (typically 12V for motorcycles).
Locate Ideal Placement Areas for Maximum Impact
Popular spots include fairings, under headlights, front panels, or even side covers—wherever your "eyes" will grab maximum attention and provide optimal visibility. Dry-fit the kit first to check clearance and angles.
Step 3: Choose the Right Animated Motorcycle Light Kit
Features to Look For
- Brightness & Visibility: Opt for high-lumen LEDs that cut through the dark and unpredictable weather.
- Animation Styles & Customization: Ensure the kit offers multiple effects and programmable options.
- Weatherproof/Durability Ratings: Look for IP65 or higher for all-season protection.
- App-Controlled Features: App controlled motorcycle lights make changing colors, animations, and brightness a breeze.
- Easy "Peel and Stick" Installation: Skip the complicated wiring and drilling. Choose peel and stick motorcycle lights for a truly DIY-friendly install.
Spotlight: Biker Eyes™ Animated Moto Eyes
- Imported Japanese Style: Straight from Japan’s underground bike scene, now raising eyebrows in the USA!
- Expressive, Customizable Eye Designs: From fierce looks to playful winks, make your ride truly unique.
- No Tools Needed for Install: Plug it in, stick it on—done in minutes. Check out the animated Moto Eyes here.
Step 4: Gather Your Tools & Prep for Installation
What You’ll Need (and What You Don’t!)
- Animated LED eye kit (like Biker Eyes™ Moto Eyes)
- Mild cleaning solution & microfiber cloth
- 12V battery or compatible USB outlet
- No: Soldering kits, drills, or advanced wiring knowledge needed!
Cleaning and Prepping the Mounting Surface
Thoroughly clean the chosen mounting area with alcohol or a mild cleaner. Removing grease and dust ensures the adhesive on peel and stick motorcycle lights bonds securely and lasts longer.
Checking Power Sources & Connections
Locate your nearest 12V outlet or USB power point on your bike. Ensure connections are easily accessible and that you won’t be pinching wires during mounting.
Step 5: Install Your New Moto Eyes & LED Lights
Follow the Installation Steps
- Peel and Stick: Securing the Lights
- Peel off the adhesive backing, press the lights firmly onto the prepped surface, and make sure they’re securely in place.
- Plug-and-Play Power Setup
- Connect the included power lead to your bike’s battery or a USB port. Many kits feature plug-and-play operation for hassle-free setup.
- Testing Your New Lights
- Power on and verify all LEDs function properly. Cycle through animations and adjust brightness to ensure full performance.
Troubleshooting Common Issues
- Lights not powering on? Double-check the connection to the power source—make sure it’s secure and compatible.
- Animations not working? Ensure your app is paired via Bluetooth and the latest firmware is installed.
- Adhesive not sticking? Clean the surface again and consider warming the adhesive slightly in cold weather for a better bond.
Tips for a Clean, Professional Look
- Hide visible wires using existing bike channels or tidy them with zip ties.
- Mount lights as symmetrically as possible for balanced effects.
- Use a small level or ruler to keep everything even—especially for expressive "eyes".
Step 6: Customize Your Look with App-Controlled Features
Download & Set Up the Control App
Follow the included QR code or instructions to download the compatible app for your animated motorcycle lights. Pair your kit via Bluetooth to unlock hands-on control.
Choose and Change Animations
Explore default “eye” expressions, blink cycles, or wild neon patterns—all changeable right from your phone. Switch between looks in seconds depending on your mood or the event.
Adjust Brightness, Color, and Patterns
Use the app sliders to fine-tune your LEDs—dial down for subtlety, or crank it up for nightlife excitement. Many setups offer full RGB color mixing, allowing you to match your paint or gear.
Upload Your Own Designs
Take customization to the next level by uploading your own animations or "eye" looks, if your system supports it. The Biker Eyes™ Moto Eyes let you give your bike a digital soul—make it wink, blink, or show a signature style that’s all your own!
Step 7: Maximize Visibility, Safety & Style
Best Practices for Motorcycle Visibility Safety Lights
- Keep brightness at safe levels—enough to stand out, but not blind oncoming traffic.
- Use animated effects to increase recognition, especially at intersections or in heavy traffic.
- Position lights high and wide for best visual impact.
Complying with Local Laws
Before hitting the streets with your new custom motorcycle lighting upgrade, check your local laws. Some areas restrict specific colors or flashing patterns, especially on public roads. For most LED eye lights, static or slow animations are street-legal—but dramatic effects are best saved for shows or private events.
Ride Responsibly: Balancing Flair with Function
As cool as your animated Moto Eyes will look, remember to prioritize visibility and riding safety. Don't let bold lighting distract you or other drivers. When in doubt, tone down effects on busy roads and amp up the fun in safer environments.
Step 8: Maintenance & Upkeep for Your Motorcycle LED Eye Lights
Regular Cleaning & Inspection
Wipe down your LEDs and wiring with a soft cloth to remove dust and road debris. Inspect for loose wires, worn adhesives, or water intrusion—especially if you ride in wet conditions.
Updating Software & Animations
Check the app or product website occasionally for firmware and animation updates. App controlled motorcycle lights often get new features with each software update.
Troubleshooting After Installation
- If a light malfunctions, inspect connections for corrosion or damage.
- For connectivity issues, reset Bluetooth and restart the app.
- Contact the manufacturer if a component fails within the warranty period.
When to Upgrade or Replace
If you notice faded brightness, inconsistent animations, or physical damage, it might be time for a refresh. Today’s motorcycle LED eye lights continue to evolve, making upgrades affordable and more impressive every year.
Conclusion: Turn Every Ride Into a Statement
Recap: Why Animated Lights Are the Ultimate Custom Motorcycle Upgrade
With animated motorcycle lights, every ride becomes your own mobile light show—amplifying your personality, creativity, and safety on the road. Featuring plug-and-play simplicity, expressive effects, and full mobile control, it’s never been easier to create a one-of-a-kind look that’s as functional as it is wild.
Get Started: Where to Find Biker Eyes™ and More
Ready to electrify your bike? Check out the Biker Eyes™ Animated Moto Eyes—the hottest trend from Japan, now available in North America. Stock moves fast, so don’t miss your chance to claim the boldest motorcycle visibility safety lights around!
Ride Bright, Ride Safe, Ride Bold
Give your bike a soul, unleash next-level style, and ride with confidence. With the right custom motorcycle lighting upgrade, you’re not just turning heads—you’re setting the pace for tomorrow’s street style. Stay bright, be safe, and keep riding bold!